HOW TO CHECK IF PLASTER IS GOOD?
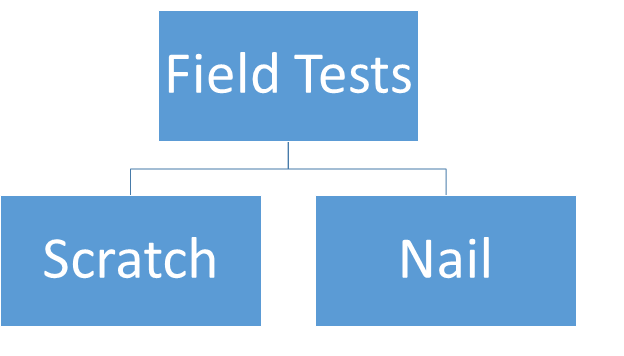
A plaster is deemed good if it passes the following simple field tests using a nail:

A plaster is deemed good if it passes the following simple field tests using a nail:
How should a wall be?
Light greyish appearance: Light greyish appearance is for a good wall. Pale white generally indicates poor strength and fails on scratch test. Similarly dark color can be deceptive, as the surface alone could be good due to addition of cement on top surface, which fails on nail test. However, color is very relative thing and strength can be confirmed by doing a scratch test / nail test.
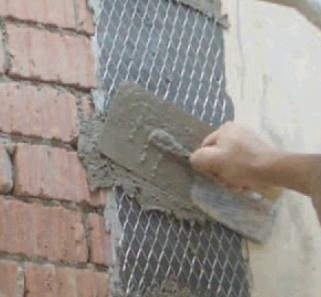
Scratch before Putty: If crushed sand is being used, before applying putty, scratching each wall ensures that the plaster beneath is intact. Any defective plaster can be replaced immediately saving time, money and bad reputation.
Field Tests:
a) Scratch Test: Forbid masons from adding additional cement on the top surface while plastering to ensure uniform strength all along the depth of the plaster. When the wall is about 1 month old, use a sharp nail to scratch over the wall to see if the wall is strong. A weak wall will take a greater indentation (sometimes followed by dust oozing out) and a strong wall will leave just a whitish line. Scratch failure is due to improper mixing of mortar materials, using mortar mix for longer time than allowed and poor curing attributing to low compressive strength.
b) Nail Test: A nail can be driven into the wall using a hammer to check how it goes in. The nail can be taken off the plaster merely by a hand owing to poor compressive strength in a poor plaster. Alternately a drill bit can be used to check the same. Nail driving is not recommended in case of AAC blocks and drill test is suggested.
There are tests like pull-off test etc., which confirm the bond strength of the plaster but these are generally expensive and conformance is localized, limited to the wall tested. It is always recommended to check each wall for scratch test before applying putty.
Look at the defect and make a note of the following:
1. Is the defect limited to a wall or a couple of walls?
2. Is there a background change at the crack?
3. Type of bricks / blocks used in masonry?
4. Pattern of the crack/ cracks? – Are they random or is there a pattern? Are they parallel / perpendicular / diagonal to ground ?
5. In case of multi-storey building, are the cracks repeating in the floors above or below at the same places?
Defects limited to a wall or a couple of walls, like scratch failure are due to mixing issues. Remove the area which is poor and replaster. Background change cracks are common in modern days. Blocks / Bricks can influence cracking as well, like AAC blocks have high tendency to cracking. Pattern of the cracks play important role in diagnosis of the crack. Repeated cracks in different floors can also say more about the defect. Read further for proper understanding of the cracks, prevention and repair.
Depending on the appearance / pattern of cracking, defects in plastering can be classified as below.
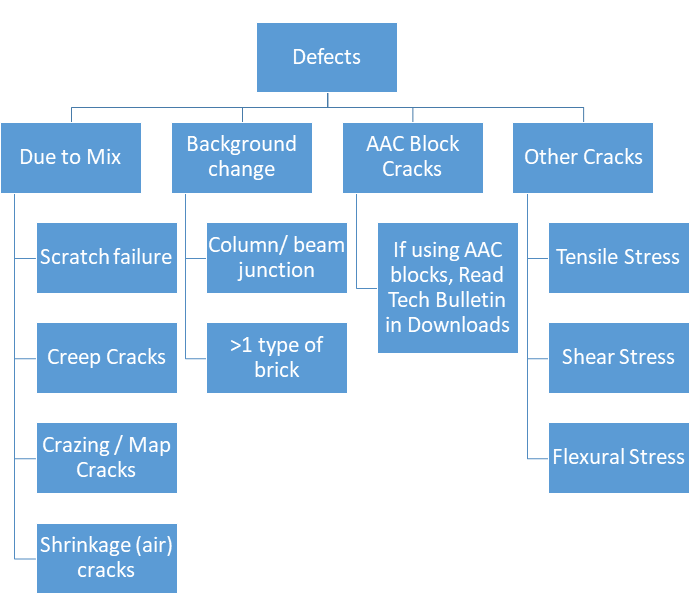
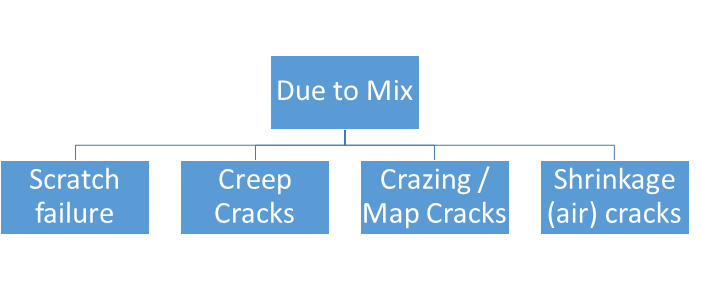
These are defects that originate due to poor proportioning of the mortar mix used in the plaster.
What are air cracks?
Shrinkage cracks: Generally, plastic shrinkage cracks are called air cracks (hair line cracks) by common people. These cracks are just on the surface and not too long and randomly placed and do not do much harm, which could be covered up using a putty /paint. These cracks usually appear on river sand plaster in less than 1/2 days but not while using crushed sand.
Crushed sand, no matter whichever processed high-quality M Sand is used has the following properties, compared to river sand:
Defects can be due to
a) Scratch failure: Too poor mix, non-uniform mixing of cement, sand, water and /or admixture, using mix after a long time after mixing are reasons for scratch failure. This is the most common problem with crushed sand (M Sand) plastering. A video is available on scratch failure in Gallery Section. A scratch failure means that the plaster is porous and water ingress is inevitable. There is no repair possible and the plaster has to be replaced.
b) Surface Crazing: Adding additional cement on the top surface of plastering or using too rich mix (mixes richer than 1:4) are causes for surface crazing. This is common when very smooth finishes are needed to avoid putty and go for painting directly over the wall. Without adding cement, Steel float may be used on the surface of the wall (without overworking fines to surface) to obtain a smooth finish, but needs expert mason to work with a steel float on a wall plaster. Steel float also affects productivity. An example of craze cracking is at the heading of this page.
c) Creep Cracking (Slippage): We call this cracking slippage because, mortar slips off (crawls down) the surface of the wall due to higher slump than required. Crushed sand (M Sand) mix needs to be semi-dry for it to stand when fresh, against gravity on a wall. Higher water content increases slump and it slips of the surface of the wall. Cracks are formed in less than 24 -36 hours of application, parallel or diagonal to the ground and deep through the depth of the plaster. Masons not used to plastering with crushed sand end up making such mistakes. Also high strength concrete elements like columns exhibit poor suction characteristics due to which slippage occurs. In such cases, dash dry cement on column etc before plastering to improve suction. These cracks can be patched up and are not harmful.
When masonry (brickwork) meets a concrete element like column / beam – it is called a background change. When two different types of brick are used in a building, the place where these two types of brick meet is also a background change. A crack develops in straight line at the junction, which is commonly encountered. Scrimming with a Mesh is usually provided to counter this background change. However, sometimes cracks develop despite providing a mesh due to modern day bricks. Ensure that the mesh is not too rigid, a fiber mesh is considered better in these days. Besides providing mesh, it is better to provide groves at the junctions to reduce the visibility of cracking.
AAC Blocks have high tendency to exhibit cracking due to contact with water. AAC blocks have to be dry at all times to avoid moisture movement and drying shrinkage. Self-curing techniques have to followed while brick binding and plastering. A technical bulletin is available on causes and prevention of cracking in AAC blocks, which can be downloaded from the Downloads section.
These are defects that originate due to tension / shear / flexural loads being transferred on to the masonry due to many reasons. These cracks are usually visible from a distance, which are parallel / perpendicular / diagonal to the ground.
Concrete and Mortar are good in compression but weak in Tension / Shear. So, even if a small magnitude of tensile / shear force come up, cracking is inevitable. As plastering is weaker than concrete, masonry plaster cracks easily even with small tension / shear force. The following are typical cracks due to Tension, Flexure and Shear, generally categorized as cracks due to Structural reasons but not due to mix etc.

a) Diagonal ripping cracks in plastering, especially at the top portion of internal plastering of the outer walls on top floors. In tall buildings, these cracks may be visible up to 3 floors from top.
As there is no restraint on the top and the roof-top slab is exposed to sun. The columns at the edges of the building try to sway out due to the expansion of the slab. We have observed this type of cracking more in structures designed for low density bricks (AAC blocks etc), because of savings employed in design.
Roof insulation is best for prevention. Making the plaster discontinuous by providing groves at the edges of column / beam /ceiling joints can help to large extent. In case of repair, wait for the expansion to happen for a couple of months and replace the cracked portion of the plaster. Provide V-grooves to the tune of 10mm while plastering. In the grove, provide a PU Sealant to avoid seepage being external walls. You may reach us for information on appropriate PU Sealant.
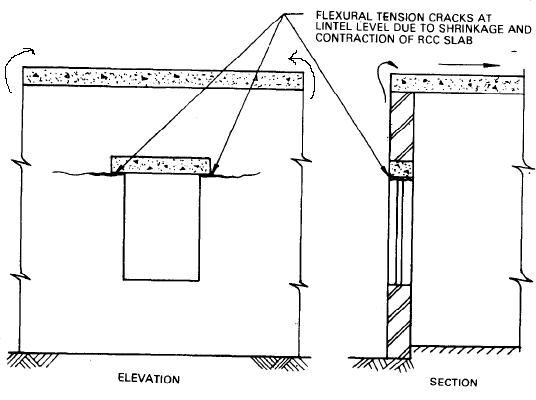
b) Horizontal cracks on top floor on the external plastering (some times cracks in internal plaster alone), just below the roof-top slab due to shrinkage and deflection of the RCC Slab.
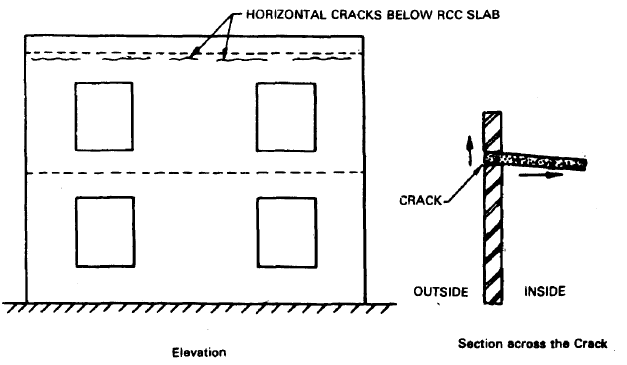
As there is no restraint on the top and the roof-top slab is exposed to sun. This causes shrinkage of the slab and lifting up the edge of the slab, besides deflection of the slab due to long spans.
Roof insulation is best for prevention. Making the plaster discontinuous by providing groves at the edges and column / beam /ceiling joints can help to large extent. In case of repair, wait for the expansion to happen for a couple of months and replace the plaster. Provide V-grooves to the tune of 10mm while plastering. In the grove, provide a PU Sealant to avoid seepage being external walls. You may reach us for information on appropriate PU Sealant.
c) Horizontal cracks on the external plastering near the lintels on top floor only.
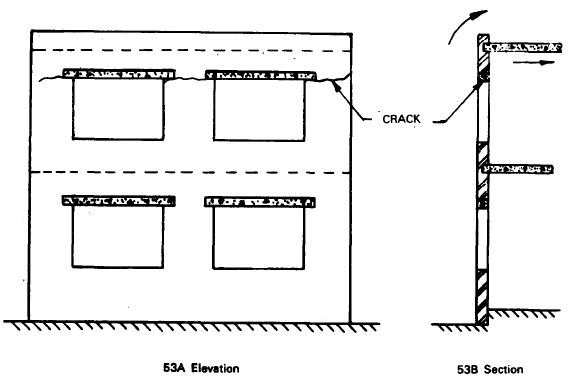
As there is no restraint on the top and the roof-top slab is exposed to sun. This causes shrinkage of the slab and exerts pulling force on the walls, where walls will crack at the lintels or near sill level, which happen to be the weakest.
Roof insulation is best for prevention. Making the plaster discontinuous by providing groves at the edges and column / beam /ceiling joints can help to large extent. In case of repair, wait for the expansion to happen for a couple of months and replace the plaster. Provide V-grooves to the tune of 10mm while plastering. In the grove, provide a PU Sealant to avoid seepage being external walls. You may reach us for information on appropriate PU Sealant.
d) Horizontal cracks on the external plastering around the corners / edges on top floor only.
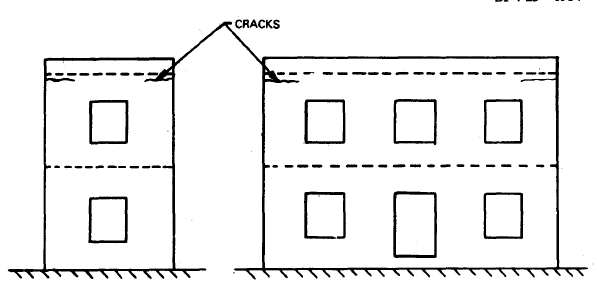
As there is no restraint on the top and the roof-top and therefore any deflection of the top slab pulls the edges of the slab due to deflection. The result is cracking masonry on edges / corners of the slab.
Roof insulation is best for prevention. Making the plaster discontinuous by providing groves at the edges and column / beam /ceiling joints can help to large extent. In case of repair, wait for the expansion to happen for a couple of months and replace the plaster. Provide V-grooves to the tune of 10mm while plastering. In the grove, provide a PU Sealant to avoid seepage being external walls. You may reach us for information on appropriate PU Sealant.
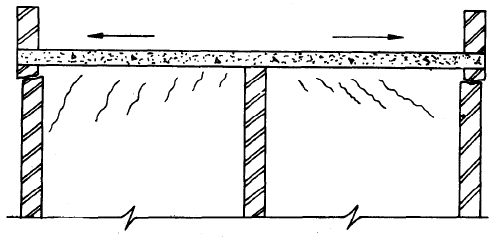
Wall cracks in center and slab on the top cracked due to expansion.
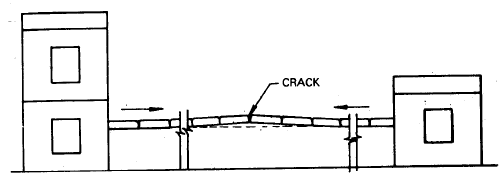
This long wall is restrained on both sides for expansion and any slab over this as well crack in the near middle as shown in the picture
Expansion joints shall be provided as per proper design. Suggestions in this regard are beyond our scope, structural engineers may be consulted in this regard. Repair in such circumstances, is not possible unless an expansion joint is provided.
Visible horizontal crack between the wall and the slab on a parapet plaster.
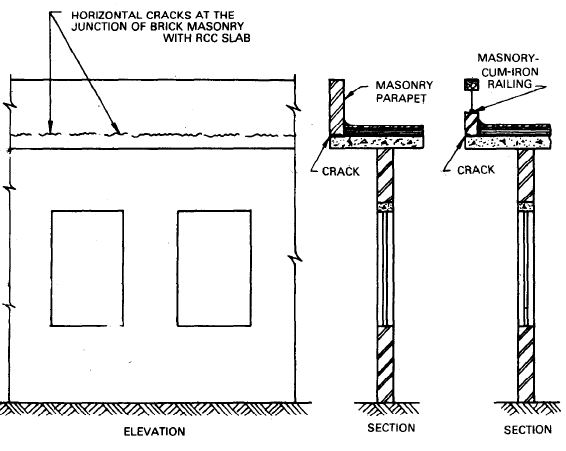
This is due to difference in thermal expansion of concrete and brick work. Iron railings in between will further improve cracking. There is not much that can be done with this type of cracking.
Best alternative is to construct the parapet wall as well with reinforced concrete with the steel embedded into the slab. Alternatively, the plaster on the slab and the parapet shall be discontinued providing a groove gap of about 10mm. Provide enough time gap between casting roof slab and building parapet wall.
For repairs, replace the plaster providing the groove cut as advised above. In the grove, provide a PU Sealant to avoid seepage being external walls. You may reach us for information on appropriate PU Sealant.
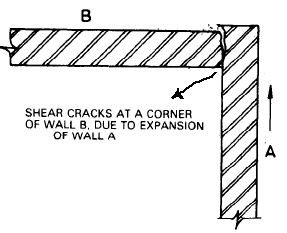
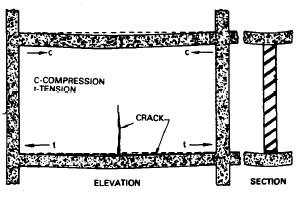
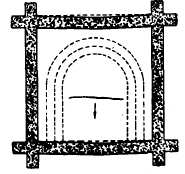
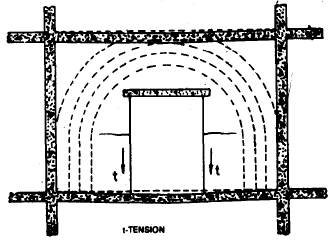
Straight line cracks wide at the window openings / concealed electrical junction boxes / concealed electric switch boards and narrow as they travel downwards perpendicular to ground.

When large windows are provided, these cracks are common. The portions marked as ‘A’ are more stressed and loaded than the portion of the wall marked as ‘B’. Thus, differential stresses are produced in the same wall and cracks will be developed as shown in the picture.
Best way is to provide smaller windows. In case unavoidable, specific care has to be taken to increase shear resistance in RCC slabs, lintels over these openings and masonry in foundation to reduce magnitude of cracking. Provide proper overhang of the lintel.
For repairs, wait for the expansion to happen and treat them by cutting about 10 cm on both sides of the crack and plastering. However, these cracks generally reappear after sometime.
Diagonal cracks over large lintels, which are wide at the lintel level and thin as they travel upward. Generally visible over large openings.

Although generally visible over large openings, lintels can shrink due to drying. These cracks appear just after the first hot summer of the building construction.
This is due to drying shrinkage of the concrete in the RCC lintel due to high water-cement ratio. Best is use a plasticizing admixture to reduce the water cement ratio and control drying shrinkage. Using precast lintels will eliminate this issue.
There are other reasons as well, such cracks develop please read further for more causes and repairs.
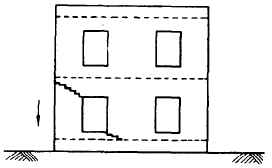
a) Wide vertical Crack at bottom of a long wall could be due to deflection of floor beneath the wall. Small horizontal cracks may also form at the top the wall near the supports.
As the floor deflects slightly, the bottom layers of the wall are subject to tension and the top layers suffer compression. This causes crack in the middle of the wall at the bottom layers. Crack is usually wide at the bottom and narrow at the top (may appear same width all through if puttied / painted). Depending on the magnitude, horizontal cracks may also appear at the supports at the top layers.
b) Diagonal cracks at the top portion of a central opening (door / window) in a long wall, when there is a deflection of floor slab.
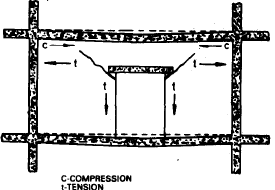
Combined stresses due to flexural tension (horizontal) in the portion of masonry above the opening and self weight (vertical) of masonry on both sides adjacent to the opening. Thus, the cracks develop diagonally starting wide at the lintel and go thinner as they proceed upward as shown in the picture.
c) Diagonal cracks at the top portion of a central opening (door / window) in a long wall, when there is a deflection of floor slab.
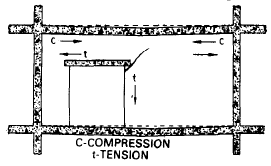
Combined stresses due to flexural tension (horizontal) in the portion of masonry above the opening and self weight (vertical) of masonry on one side adjacent to the opening, facing the deflection. As the opening is not in center, in case of deflection, a crack is sure to appear as shown in the image.
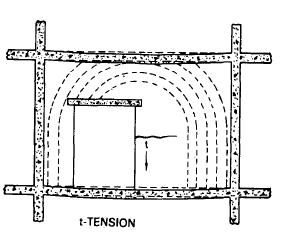
d) Wide horizontal crack in a wall where length and height are similar due to deflection of floor slab.
When the length of the wall is less than the height of the floor, a horizontal crack develops in case of deflection of the floor slab. The dotted lines in the figure is an illustration of stresses developed by an arch-action as the bottom support is going down due to deflection.
e) Horizontal cracks on both sides of opening (door / window) in a wall whose length is close to height due to deflection of floor slab.
The crack occurs in the lower portion mainly due to self weight of unsupported masonry on both sides of the opening on deflection of the floor slab.
f) Horizontal cracks on one side of the door at almost center of the opening in a wall whose length is close to height due to deflection of floor slab.
The crack occurs in the lower portion mainly due to self weight of unsupported masonry on one side of the opening due to deflection of the floor slab.
There are many reasons for deflection of floor slabs and it is common although many measures are taken. RCC members are prone to deflection due to self-weight and ageing. In new construction, it is necessary to provide a good time interval between RCC work and constructing partition walls abutting to the columns. In the first few weeks, the concrete members slightly deflect due to self weight and construction of walls shall happen after that to avoid these types of cracks.
In case of repairs, wait for sometime for the deflection to complete. Strip open the plaster around the crack and replaster it.
Shear cracks in buildings when there is large settlement of foundation either due to unequal bearing pressure or low factor of safety.
a) Soil settlement due to shrinkable clay (expansive soil), rain / surface water seepage into foundation and poor plinth.
Easily identifiable, these cracks are wide at the top and they become narrow as they progress downwards. More likely, they are diagonal in shape.
When the soil beneath is not compacted enough or heavy rains causing non-uniform settlement of soil under the foundation. Sound plinth protection helps avoid seepage of rain / surface water into the foundation. Wait for the settlement to happen and repair using proper techniques depending on the magnitude of the settlement.
b) Foundation movement due to vegetation (roots of tree etc) interfering with foundation.
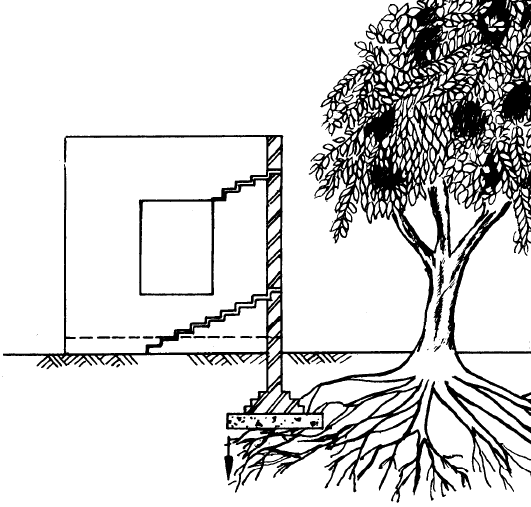
Do not let trees grow too close to the building. Especially if the soil beneath is shrinkable clay, be more cautious with the settlement of the foundation. Do no start construction soon after cutting the trees. In such cases, the cracks will be wide at the base and will become narrow on the top. Because, the soil which was dehydrated due to presence of trees becomes hydrated with rain and the soil swells exerting upward pressure on the foundation.
Do not cut trees that are far off and that do not interfere with the foundation of the building. Cutting such trees will cause gaps and the soil there by consolidates allowing settlement. Ensure there are no fast growing trees near the building. If trees are cut off and foundation has to be taken up, please consolidate the soil and wait for settlement to happen and then construction shall begin, especially in shrinkable clay (expansive soil).
c) Many random cracks all round the building. Cracks are many, some are wide, some narrow, some long and some short at random places with no proper pattern.
Can either be due to foundation settlement due to soil or sulfate attack on foundation. Sulfate attack is slow and usually takes around 2-3 years for the cracks to propagate till the super structure. However, settlement can start in a couple of months of start of construction, depending on the soil characteristics and the foundation employed.
At RenderCon, we make product solutions for a sustainable tomorrow. We develop affordable solutions to address construction needs with emphasis on environmental production. We combine latest technologies across the world to help our customers across India to meet the needs of today and tomorrow.